
Not every buyer has access to a laboratory or an ASTM-certified testing facility. But whether you're inspecting slabs at a supplier's showroom, visiting a Chinese marble factory, or evaluating a sample that arrived by courier — you can assess marble quality in minutes with five simple tests.
These tests won't replace professional inspection for large orders, but they'll help you eliminate low-quality material fast and go into negotiations with confidence.
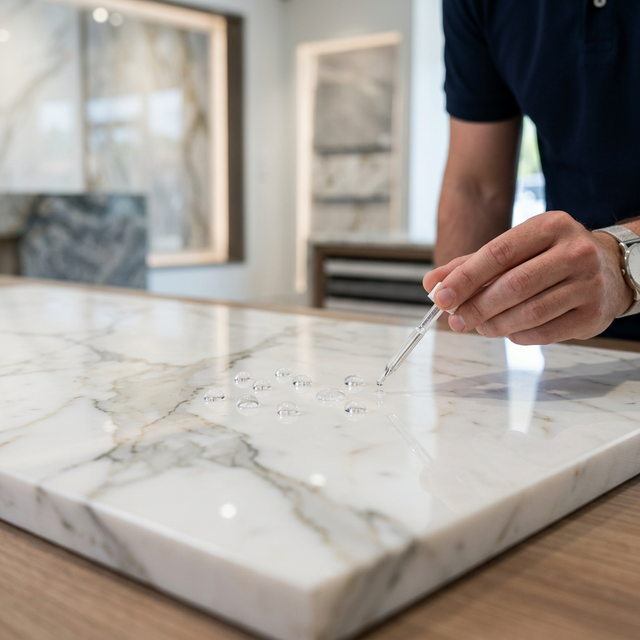
Test 1: The Water Drop Test (Porosity Check)
What it reveals: How porous the marble is. Higher porosity = more stain-prone and potentially weaker structurally.
How to do it:
- Place 3–5 drops of plain water on the marble surface
2. Start a timer
- Observe:
| Result | Time to Absorb | What It Means | Quality Indicator |
|---|---|---|---|
| Water beads and sits on the surface | > 10 minutes | Very low porosity — excellent density | ✅ High quality |
| Water slowly darkens the surface | 3–10 minutes | Moderate porosity — acceptable for most uses | ⚠️ Standard quality |
| Water absorbs almost immediately | < 3 minutes | High porosity — will stain easily and may have structural weakness | ❌ Low quality |
What the pros look for: ASTM C97 specifies water absorption should be ≤ 0.20% for quality marble. A-Grade material typically shows ≤ 0.15%.
Tip: Run this test on an unpolished edge or the rough back of the slab, not the polished face. Polished surfaces have their pores mechanically sealed, which masks true porosity.
Test 2: The Scratch Test (Hardness Check)
What it reveals: The marble's hardness and resistance to everyday wear.
How to do it:
- Find an inconspicuous spot (slab edge or back surface)
- Try to scratch the surface with your fingernail first — genuine marble should NOT scratch from a fingernail
- Then try a copper coin (penny/1-cent coin)
| Scratch Source | Mohs Hardness | Result on Genuine Marble |
|---|---|---|
| Fingernail | 2.5 | No mark — marble is harder (Mohs 3–4) |
| Copper coin | 3.0 | Very faint mark or no mark |
| Steel nail/key | 5.5–6.5 | Will scratch marble (this is normal — marble is softer than steel) |
| Glass | 5.5 | Will scratch marble (normal) |
Red flag: If your fingernail leaves a clear scratch, the material may be low-quality limestone or resin-bonded composite — not true metamorphic marble.
Related reading: What Is Artificial Marble? — learn how to distinguish natural marble from engineered alternatives.
Test 3: The Lemon Juice Test (Acid Sensitivity Check)
What it reveals: Whether the stone is genuine calcite-based marble (which reacts to acid) versus granite or quartzite (which don't react).
How to do it:
- Place a small drop of lemon juice or white vinegar on an inconspicuous area
- Wait 5 minutes
3. Wipe off and observe
| Result | What It Means |
|---|---|
| Visible etch mark (dull spot where the acid was) | ✅ Confirms it's genuine marble or limestone (calcite reacts with acid) |
| Slight fizzing when acid is applied | ✅ Definitely marble — you can sometimes see tiny CO₂ bubbles |
| No reaction at all | ⚠️ Not marble — likely granite, quartzite, or engineered stone |
Why this matters: This test confirms material authenticity. Some suppliers market granite or dolomitic limestone as "marble" to command a higher price. The acid test catches this instantly.
Caution: This test creates a permanent etch mark. Only do it on a sample piece, a slab edge, or a small, hidden area — never on the polished face of a slab you plan to install.
Test 4: The Tap Test (Structural Integrity Check)
What it reveals: Whether the slab has hidden internal cracks, voids, or delamination that aren't visible from the surface.
How to do it:
- Lay the slab flat on a stable surface (or lean it against an A-frame as typically displayed in slab yards)
- Gently knock the surface with your knuckle in 10–15 different spots — especially near edges and corners
- Listen carefully:
| Sound | What It Means |
|---|---|
| Clear, ringing tone (like tapping porcelain) | ✅ Dense, solid, no internal defects |
| Consistent tone across the slab | ✅ Uniform internal structure |
| Dull, hollow thud in some areas | ❌ Internal void, crack, or delamination — stone may break during transport or installation |
| Different tones across the slab | ⚠️ Investigate further — may indicate a filled fissure zone or thickness variation |
Pro technique: Factory QC teams at FutureStone tap-test every slab before packing. Ask your supplier if they perform this as part of their standard quality control process.
Test 5: The 1-Meter Visual Inspection (Surface Quality Check)
What it reveals: Surface defects, polish quality, and overall slab cosmetics.
How to do it:
- Stand exactly 1 meter (3 feet) from the slab face
- View it under natural light or uniform artificial light (avoid direct sunlight which can hide defects)
- Systematically scan from top-left to bottom-right, checking for:
| Defect Type | What to Look For | Acceptable for A-Grade? |
|---|---|---|
| Visible cracks | Dark lines that run through the surface | ❌ No |
| Filled fissures | Color-matched resin fills that are visible at 1 meter | ❌ No (acceptable at close inspection only) |
| Iron spots | Orange/brown dots (will rust and worsen over time) | ❌ No |
| Pitting | Small holes in the polished surface | ❌ No (acceptable for honed/leathered finishes) |
| Uneven polish | Dull patches or streaks in gloss level | ❌ No |
| Edge chips | Small breaks on slab edges | ⚠️ Minor chips from handling are normal; deep chips are not |
The 1-meter rule is an industry standard. When you specify quality in a purchase order, state: "No surface defects visible to the naked eye at 1 meter distance under uniform lighting."
Quick Reference: All 5 Tests on One Card
| Test | Equipment Needed | Time | What It Checks |
|---|---|---|---|
Marble quality inspection buyer guide
The five quick tests in this article help buyers screen marble before a purchase, but a project order also needs documented evidence from the supplier. For slabs, cut-to-size tiles, countertops, wall panels, stair treads and stone furniture, the buyer should connect each quick test with current slab photos, sample approval, thickness tolerance, finish quality, inspection report, crate marks and packing photos before shipment.
Use the checks below as a bridge between on-site quality tests and a factory RFQ. The goal is to make the supplier show the same marble lot that will be used for the order, explain any fissures or resin treatment, and confirm how the approved pieces will be fabricated, labeled and packed for export.
marble slab inspection matrix
| Inspection item | What the quick test checks | Supplier evidence to request |
|---|---|---|
| Water absorption | Porosity, sealing need and wet-area risk | Current slab photos, finish sample, water-drop result and maintenance note |
| Scratch and surface test | Finish durability, polish quality and everyday wear risk | Finish sample, polishing grade, close-up photos and acceptable surface variation |
| Acid sensitivity | Etching risk for countertops, vanities and commercial use | Application recommendation, care instructions and sample approval under project lighting |
| Tap and visual inspection | Cracks, hollow sound, repaired areas, resin and color consistency | Inspection report, slab ID photos, repair disclosure, usable yield and dry-lay photos |
| Packing and shipment | Whether approved pieces can arrive in the same condition | Piece labels, crate marks, packing photos, loading photos and packing list |
Marble quality inspection checklist before deposit
- Confirm the material lot: request current slab photos or video, slab IDs, dimensions, thickness, quantity and lighting conditions for the exact lot to be reserved.
- Approve the finish sample: compare polished, honed, leathered or brushed finishes against the actual application, traffic level, moisture exposure and maintenance expectation.
- Record visible variation: define acceptable color range, vein movement, fissures, resin treatment, filled areas, repaired spots and usable yield before cutting.
- Tie tests to application: separate countertop, wall panel, floor tile, staircase and furniture requirements so the supplier does not quote one generic quality level for every use.
- Require pre-shipment proof: ask for inspection report photos, dry-lay photos, piece labels, crate marks, packing photos and loading photos before final balance payment.
Marble quality RFQ handoff checklist
A complete marble quality RFQ should include stone name, intended application, grade expectation, current slab photos, sample requirement, slab dimensions, thickness, finish, acceptable color and vein range, fissure and resin limits, required quick-test evidence, inspection report format, cut-to-size drawings, dry-lay requirement, quantity, crate marks, packing photos, loading photos, destination and delivery deadline. For larger projects, split premium visible areas from secondary areas so inspection criteria and price are compared fairly.
For connected checks, review the marble material range, marble grading buyer guide, marble supplier selection guide, marble factory audit guide and marble packing methods. Send the final inspection requirements through FutureStone contact for quotation support.
FAQ
What should buyers include in a marble quality inspection request?
Buyers should include the stone name, application, grade expectation, current slab photos, slab IDs, dimensions, thickness, finish, acceptable color and vein range, fissure and resin limits, inspection report format, cut-to-size drawings, dry-lay requirement, crate marks, packing photos and delivery deadline.
Can the five quick marble tests replace factory inspection?
No. The quick tests help buyers screen porosity, surface durability, acid sensitivity, cracks and visual quality, but factory inspection is still needed to verify the actual slab lot, fabrication dimensions, finish quality, piece labels, crate marks and packing before shipment.
What proof should a supplier send before shipping marble?
A supplier should send current slab photos, approved sample references, inspection report photos, dry-lay photos for visible pieces, piece labels, crate marks, packing photos, loading photos and a packing list that matches the approved drawings and quantity.
Need a material or project recommendation?
Share the page, material target or project requirement with our team.